What wave soldering is, the four steps of the process (fluxing, preheating, the solder wave and cooling) and the assembly types it is used for.
 Onlitex Engineering Team1 min read
What is wave soldering?
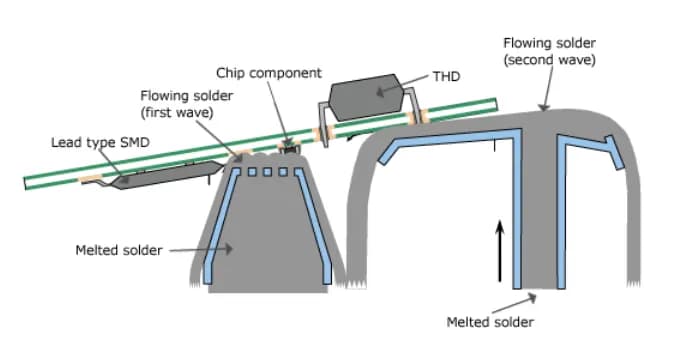
As the name suggests, wave soldering joins components to a PCB using a liquid "wave" formed by motor agitation, and the liquid is molten tin solder. It is carried out in a wave soldering machine; the image below shows an example.

The wave soldering process
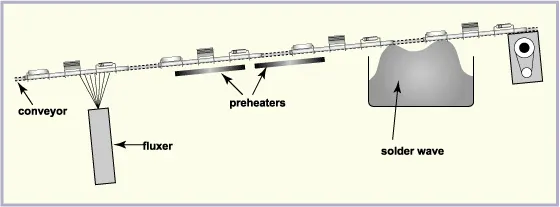
The wave soldering process has four steps: flux spraying, preheating, wave soldering and cooling.
Step 1: Flux spraying
A clean metal surface is essential for good soldering performance, and this depends on the solder flux. Flux plays a crucial role in making the soldering process go smoothly.
Step 2: Preheating
The PCBs travel on pallets along a chain, similar to a conveyor belt, through a heating tunnel that preheats the boards and activates the flux.
Step 3: Wave soldering
As the temperature keeps rising, the solder becomes liquid and forms a wave. The boards travel over the edge of the wave, and the components are solidly bonded to the boards.
Step 4: Cooling
The wave soldering profile follows a temperature curve. After the temperature peaks in the wave soldering stage, it falls in what is called the cooling zone. Once the board has cooled to room temperature, it has been successfully assembled.
Applications of wave soldering
Wave soldering is used for THT (through-hole technology) and DIP (dual in-line package) assembly, and also for SMT (surface mount technology).
For a wider comparison of assembly methods, read SMT vs through-hole PCB assembly, or learn how reflow soldering works.
- #wave soldering
- #through-hole assembly
- #THT